How to Make Ultimate Tofu Quino Black Sesame Patties

How to Make Ultimate Tofu Quino Black Sesame Patties

Tofu Quino Black Sesame Patties.

Tofu Quino Black Sesame Patties

Hey everyone, it is Drew, welcome to my recipe page. Today, we're going to make a distinctive dish, tofu quino black sesame patties. It is one of my favorites food recipes. This time, I am going to make it a little bit tasty. This will be really delicious.

Tofu Quino Black Sesame Patties is one of the most favored of recent trending foods on earth. It's enjoyed by millions daily. It is easy, it's fast, it tastes yummy. Tofu Quino Black Sesame Patties is something that I have loved my whole life. They are fine and they look wonderful.

To begin with this particular recipe, we must prepare a few components. You can have tofu quino black sesame patties using 9 ingredients and 9 steps. Here is how you cook it.

The ingredients needed to make Tofu Quino Black Sesame Patties:

  1. {Make ready of cooked Quinoa.
  2. {Make ready of Firm Tofu.
  3. {Get of Baby Bok Choy.
  4. {Get of Roast Black Sesame.
  5. {Get of Shedded Carrots.
  6. {Take of corn starch.
  7. {Prepare of Soy Sauce.
  8. {Get of Salt.
  9. {Make ready of Pepper.

Steps to make Tofu Quino Black Sesame Patties:

  1. Wash and chop Baby Bok Choy into small pieces and set aside.
  2. Put the firm tofu into a big bowl.
  3. Add Soy Sauce, Salt, Pepper and corn starch.
  4. Add Quinoa into the bowl and knead them inside the bowl.
  5. Add Baby Bok Choy and shedded carrots.
  6. Add Roasted Black Sesame and mixed them well.
  7. Shape it into small Patty and have the frying pan ready.
  8. Pan fry 3 minutes on each side.
  9. Done and ready to serve.

So that's going to wrap it up with this special food tofu quino black sesame patties recipe. Thank you very much for reading. I'm sure you can make this at home. There's gonna be more interesting food at home recipes coming up. Remember to save this page on your browser, and share it to your family, friends and colleague. Thank you for reading. Go on get cooking!

Step-by-Step Guide to Prepare Award-winning Chinese Buffalo Wings With
Thai Sweet Chili Flavour

Step-by-Step Guide to Prepare Award-winning Chinese Buffalo Wings With Thai Sweet Chili Flavour

Chinese Buffalo Wings With Thai Sweet Chili Flavour.

Chinese Buffalo Wings With Thai Sweet Chili Flavour

Hey everyone, it's me again, Dan, welcome to our recipe site. Today, I will show you a way to make a distinctive dish, chinese buffalo wings with thai sweet chili flavour. One of my favorites. This time, I will make it a little bit tasty. This will be really delicious.

Chinese Buffalo Wings With Thai Sweet Chili Flavour is one of the most well liked of current trending foods in the world. It is appreciated by millions daily. It's easy, it is quick, it tastes yummy. They are fine and they look fantastic. Chinese Buffalo Wings With Thai Sweet Chili Flavour is something which I've loved my entire life.

To begin with this recipe, we must first prepare a few components. You can have chinese buffalo wings with thai sweet chili flavour using 15 ingredients and 7 steps. Here is how you can achieve it.

The ingredients needed to make Chinese Buffalo Wings With Thai Sweet Chili Flavour:

  1. {Make ready of chicken wing and drumette.
  2. {Take of DRY RUB.
  3. {Take of flour.
  4. {Take of salt.
  5. {Prepare of curry powder.
  6. {Prepare of fine chili powder.
  7. {Take of onion powder.
  8. {Make ready of garlic powder.
  9. {Get of black pepper.
  10. {Make ready of THAI SWEET CHILI SAUCE.
  11. {Get of thai sweet chili sauce.
  12. {Prepare of fine dice garlic.
  13. {Make ready of fine dice shallot.
  14. {Get of deseeded fine dice red chili pepper.
  15. {Prepare of dice spring onion.

Steps to make Chinese Buffalo Wings With Thai Sweet Chili Flavour:

  1. MARINATE CHICKEN.
  2. marinate chicken with dry rub then set aside for 30 minute.
  3. DEEP FRY CHICKEN.
  4. deep fry chicken till lightly brown and crispy for about 5 minute or longer depending on the thickness and size of the chicken.
  5. THAI SWEET CHILI SAUCE.
  6. in pan pour sauce and bring to a boil then off heat and set aside.
  7. once cool add spring onion and toss fried chicken and serve immediately.

So that is going to wrap this up for this exceptional food chinese buffalo wings with thai sweet chili flavour recipe. Thanks so much for reading. I'm sure you can make this at home. There's gonna be more interesting food in home recipes coming up. Remember to save this page in your browser, and share it to your loved ones, friends and colleague. Thank you for reading. Go on get cooking!

Recipe of Award-winning Egg Salad Sandwich with Avocado and Shrimp

Recipe of Award-winning Egg Salad Sandwich with Avocado and Shrimp

Egg Salad Sandwich with Avocado and Shrimp.

Egg Salad Sandwich with Avocado and Shrimp

Hey everyone, it is me, Dave, welcome to our recipe page. Today, we're going to prepare a special dish, egg salad sandwich with avocado and shrimp. It is one of my favorites food recipes. For mine, I am going to make it a bit tasty. This is gonna smell and look delicious.

Egg Salad Sandwich with Avocado and Shrimp is one of the most well liked of recent trending meals on earth. It's enjoyed by millions daily. It's easy, it's fast, it tastes yummy. Egg Salad Sandwich with Avocado and Shrimp is something that I have loved my entire life. They are nice and they look wonderful.

To begin with this recipe, we have to first prepare a few components. You can have egg salad sandwich with avocado and shrimp using 7 ingredients and 13 steps. Here is how you cook it.

The ingredients needed to make Egg Salad Sandwich with Avocado and Shrimp:

  1. {Take 2 of Eggs.
  2. {Prepare 1/4 of Onion.
  3. {Prepare 5 of to 10 medium shrimp Black tiger shrimp (or frozen peeled shrimp).
  4. {Make ready 1/2 of Avocado.
  5. {Prepare 1 of Salt (I used Krazy Salt).
  6. {Prepare 1 of Pepper.
  7. {Take 1/2 of to 1 tablespoon Lemon juice.

Steps to make Egg Salad Sandwich with Avocado and Shrimp:

  1. Place the eggs in a pot of cold water and bring it to the boil. Hard boil the eggs..
  2. While the eggs are boiling, finely chop the onion. You can use it as-is, but if you find onion a bit strong, soak in cold water for a while to soften the flavor..
  3. Cut the black tiger shrimp into lengths slightly over 1 cm. Sprinkle with a little white wine if you have it, plus salt and pepper, and microwave for 2 minutes (at 600 W)..
  4. Cool the shrimp..
  5. Scoop out the avocado into a bowl, and mash with the back of a fork. Sprinkle with lemon juice..
  6. Chop up the hard boiled egg..
  7. Add the finely chopped onion, the cut up shrimp and chopped up egg to the bowl with the mashed avocado, season to taste with salt and pepper, and mix well. I like to season with Krazy Salt..
  8. This is the finished avocado dip with chunky pieces of shrimp..
  9. Sandwich the mixture between 2 slices of bread to finish. By the way, the bread is a homemade rustic French loaf I baked for the first time..
  10. You can use the mixture as a dip or on open faced sandwiches..
  11. If making open faced sandwiches, you can drizzle on a little extra virgin olive oil. Or try grinding on some black pepper..
  12. This filling is delicious between slices of toast. It's also good in rolls or in croissants. The version in the photo has no shrimp, but it was delicious nevertheless..
  13. By the way, if you want to make the pain de campagne yourself, I really recommend Yuutanku's. Even though it was my first time baking this kind of bread, I had no problems! https://cookpad.com/us/recipes/148808-aromatic-rustic-french-bread-with-honey-and-sesame-seeds.

So that is going to wrap it up with this special food egg salad sandwich with avocado and shrimp recipe. Thank you very much for your time. I am confident that you can make this at home. There's gonna be interesting food in home recipes coming up. Remember to save this page on your browser, and share it to your loved ones, colleague and friends. Thanks again for reading. Go on get cooking!

How to Prepare Super Quick Homemade Garlic, Butter Herb Wings Baked

How to Prepare Super Quick Homemade Garlic, Butter Herb Wings Baked

Garlic, Butter Herb Wings Baked.

Garlic, Butter Herb Wings Baked

Hello everybody, I hope you're having an amazing day today. Today, we're going to prepare a distinctive dish, garlic, butter herb wings baked. One of my favorites. This time, I am going to make it a bit unique. This will be really delicious.

Garlic, Butter Herb Wings Baked is one of the most favored of recent trending meals on earth. It's simple, it is fast, it tastes yummy. It is enjoyed by millions every day. They're nice and they look wonderful. Garlic, Butter Herb Wings Baked is something which I've loved my whole life.

To begin with this recipe, we must prepare a few ingredients. You can cook garlic, butter herb wings baked using 15 ingredients and 7 steps. Here is how you can achieve it.

The ingredients needed to make Garlic, Butter Herb Wings Baked:

  1. {Prepare of Wings.
  2. {Prepare of thawed frozen or fresh chicken wings.
  3. {Take of garlic powder.
  4. {Take of chili powder.
  5. {Take of lemon juice.
  6. {Take of olive oil.
  7. {Prepare of cayenne pepper (optional).
  8. {Make ready of Sauce.
  9. {Prepare of butter.
  10. {Make ready of minced garlic.
  11. {Take of olive oil.
  12. {Make ready of garlic powder.
  13. {Prepare of assorted chopped fresh herbs, parsley, basil, rosemary, oregano.
  14. {Get of salt (or to taste).
  15. {Prepare of ground black pepper (or to taste).

Steps to make Garlic, Butter Herb Wings Baked:

  1. For the chicken: Mix everything together except the wings in a large bowl..
  2. Add the wings to coat evenly..
  3. Place in the refrigerator for 3 hours or overnight..
  4. For the sauce: Melt butter, then mix the seasonings with herbs, set aside..
  5. Cooking: Bake at 400°F hot oven on greased foil or parchment paper until crispy around 1 hour or more. Frozen take about 10 minutes longer than fresh or thawed..
  6. When crispy and browned, coat with 1/2 the butter and herb sauce..
  7. Bake for around 10 minutes pour the rest of the sauce over the wings to soak in the butter and garlic herb sauce and serve..

So that is going to wrap it up with this exceptional food garlic, butter herb wings baked recipe. Thank you very much for reading. I'm sure you will make this at home. There is gonna be interesting food at home recipes coming up. Don't forget to bookmark this page in your browser, and share it to your loved ones, colleague and friends. Thanks again for reading. Go on get cooking!

Recipe of Favorite potato and ham soup

Recipe of Favorite potato and ham soup

potato and ham soup.

potato and ham soup

Hello everybody, hope you are having an incredible day today. Today, I will show you a way to make a special dish, potato and ham soup. One of my favorites food recipes. This time, I'm gonna make it a little bit tasty. This will be really delicious.

potato and ham soup is one of the most well liked of current trending meals on earth. It's appreciated by millions daily. It is simple, it's fast, it tastes delicious. They are fine and they look wonderful. potato and ham soup is something which I have loved my whole life.

To get started with this recipe, we have to prepare a few components. You can cook potato and ham soup using 10 ingredients and 2 steps. Here is how you cook it.

The ingredients needed to make potato and ham soup:

  1. {Make ready of red potatoe.
  2. {Prepare of russet potatoe.
  3. {Take of baking potatoe ( leftovers if you have one ).
  4. {Prepare of thick cut bacon.
  5. {Make ready of slices of country ham ( bone in ).
  6. {Prepare of frozen onion mix.
  7. {Get of olive oil.
  8. {Prepare of chicken broth.
  9. {Get of half & half.
  10. {Prepare of water.

Steps to make potato and ham soup:

  1. heat up 1 tablespoon of olive oil in stock pot, cut bacon and ham into chunks cook in stock pot until brown add onion mix and cook until tender. add chicken stock and simmer cut up red potatoes in bite size pieces. cut up russet potatoes in medium size pieces. add to chicken broth and simmer until tender.
  2. add water and half and half and baking potato ( chopped into chunks ) in to soup mash down soup mixture with a potato masher about 3 or 4 times leaving plenty of chunks season with your favorite seasoning. simmer for about 20 to 25 minutes..

So that is going to wrap this up for this exceptional food potato and ham soup recipe. Thanks so much for your time. I am sure you can make this at home. There is gonna be interesting food in home recipes coming up. Remember to bookmark this page on your browser, and share it to your family, friends and colleague. Thanks again for reading. Go on get cooking!

Step-by-Step Guide to Prepare Award-winning Oyster Cracker snack

Step-by-Step Guide to Prepare Award-winning Oyster Cracker snack

Oyster Cracker snack.

Oyster Cracker snack

Hey everyone, I hope you are having an amazing day today. Today, I'm gonna show you how to prepare a special dish, oyster cracker snack. One of my favorites food recipes. For mine, I will make it a bit tasty. This will be really delicious.

Oyster Cracker snack is one of the most favored of recent trending foods in the world. It's appreciated by millions daily. It is simple, it's fast, it tastes delicious. Oyster Cracker snack is something which I have loved my whole life. They are nice and they look fantastic.

To begin with this recipe, we must prepare a few ingredients. You can have oyster cracker snack using 5 ingredients and 5 steps. Here is how you cook it.

The ingredients needed to make Oyster Cracker snack:

  1. {Get 24 oz of Oyster crackers.
  2. {Get 1 cup of Oil.
  3. {Prepare 1 tsp of Lemon Pepper salt.
  4. {Make ready 1 tsp of Dill weed.
  5. {Make ready 1 envelope of Hidden Valley Ranch dry original salad dressing mix.

Steps to make Oyster Cracker snack:

  1. Mix oil, lemon pepper, dill and dry Ranch dressing packet..
  2. Pour over Oyster crackers..
  3. Let set 1 to 2 hours to "dry"..
  4. Stir occasionally..
  5. Place in airtight container..

So that is going to wrap it up for this special food oyster cracker snack recipe. Thank you very much for your time. I'm confident that you will make this at home. There is gonna be more interesting food at home recipes coming up. Remember to bookmark this page in your browser, and share it to your loved ones, friends and colleague. Thank you for reading. Go on get cooking!

Steps to Prepare Quick Amy's Refreshing Honey Mustard Chicken Salad .

Steps to Prepare Quick Amy's Refreshing Honey Mustard Chicken Salad .

Amy's Refreshing Honey Mustard Chicken Salad ..

Amy's Refreshing Honey Mustard Chicken Salad .

Hello everybody, I hope you are having an incredible day today. Today, we're going to prepare a special dish, amy's refreshing honey mustard chicken salad .. One of my favorites. This time, I will make it a little bit tasty. This is gonna smell and look delicious.

Amy's Refreshing Honey Mustard Chicken Salad . is one of the most favored of current trending meals on earth. It is appreciated by millions daily. It's simple, it's quick, it tastes yummy. Amy's Refreshing Honey Mustard Chicken Salad . is something that I have loved my whole life. They are nice and they look wonderful.

To get started with this particular recipe, we have to prepare a few components. You can cook amy's refreshing honey mustard chicken salad . using 14 ingredients and 7 steps. Here is how you can achieve it.

The ingredients needed to make Amy's Refreshing Honey Mustard Chicken Salad .:

  1. {Prepare of chicken breasts - skinned and boned ..
  2. {Get of kiwi fruits.
  3. {Take of seedless watermelon ..
  4. {Take of rockmelon ..
  5. {Make ready of mango.
  6. {Prepare of english mustard ..
  7. {Prepare of wholegrain mustard ..
  8. {Get of runny honey ..
  9. {Prepare of lemon juice ..
  10. {Take of olive oil ..
  11. {Take of garlic ..
  12. {Make ready of salt ..
  13. {Prepare of cracked pepper ..
  14. {Make ready of fresh mixed lettuce leaves ..

Instructions to make Amy's Refreshing Honey Mustard Chicken Salad .:

  1. Deseed rockmellon and discard seeds . Using a mellon baller , scoop out the flesh of the rockmelon and watermelon . Peel the kiwi fruit and the mango , cut the kiwi fruits in half lengthways then slice kiwi halves , cut flesh cheeks from mango and dice the mango flesh ..
  2. Using a sharp knife , cut the chicken breasts into about 1cm thick by 2cm strips . Heat 3 tablespoons of the olive oil in a frying pan and fry the chicken strips over moderate heat for about 5-8 minutes until browned and tender then remove from the heat and crush the garlic and add it to the chicken along with the salt and cracked black pepper and stir to combine ..
  3. For the dressing , whisk both the English mustard and the wholegrain mustard , honey and the lemon juice , together then whisk in the remaining 2 tablespoons of olive oil , season with salt and cracked black pepper , to combine all well ..
  4. whilst chicken is still warm add 1/3 of the prepared dressing to the chicken and mix well to coat all , let cool ..
  5. Place prepared chicken in a large bowl and add the melon balls , mango cubes and the kiwi fruit slices along with the remaining 3/4 of the prepared dressing and toss together so everything is well coated in the dressing ..
  6. Wash and dry the lettuce leaves and arrange them on a serving plate ..
  7. Spoon the prepared chicken salad ontop of the arranged lettuce and serve . enjoy . :-) ..

So that's going to wrap it up for this special food amy's refreshing honey mustard chicken salad . recipe. Thanks so much for your time. I'm sure you can make this at home. There is gonna be more interesting food in home recipes coming up. Don't forget to bookmark this page on your browser, and share it to your family, friends and colleague. Thank you for reading. Go on get cooking!

Simple Way to Prepare Perfect Porchetta Wrapped Turkey Meatloaf
(Keto/Low Carb)

Simple Way to Prepare Perfect Porchetta Wrapped Turkey Meatloaf (Keto/Low Carb)

Porchetta Wrapped Turkey Meatloaf (Keto/Low Carb).

Porchetta Wrapped Turkey Meatloaf (Keto/Low Carb)

Hello everybody, hope you're having an amazing day today. Today, I'm gonna show you how to make a distinctive dish, porchetta wrapped turkey meatloaf (keto/low carb). It is one of my favorites. For mine, I am going to make it a bit unique. This is gonna smell and look delicious.

Porchetta Wrapped Turkey Meatloaf (Keto/Low Carb) is one of the most well liked of recent trending meals in the world. It is appreciated by millions daily. It is easy, it is fast, it tastes yummy. They are fine and they look fantastic. Porchetta Wrapped Turkey Meatloaf (Keto/Low Carb) is something which I have loved my whole life.

To get started with this particular recipe, we must first prepare a few components. You can have porchetta wrapped turkey meatloaf (keto/low carb) using 11 ingredients and 3 steps. Here is how you cook it.

The ingredients needed to make Porchetta Wrapped Turkey Meatloaf (Keto/Low Carb):

  1. {Take of Ground Turkey.
  2. {Prepare of egg.
  3. {Get of almond flour.
  4. {Make ready of parsley.
  5. {Prepare of onion powder.
  6. {Take of garlic powder.
  7. {Take of salt.
  8. {Make ready of black pepper.
  9. {Make ready of avocado oil.
  10. {Take of sugar free ketchup.
  11. {Make ready of porchetta.

Instructions to make Porchetta Wrapped Turkey Meatloaf (Keto/Low Carb):

  1. Pre heat oven to 350degrees. Hand mix all ingredient in bowl (except porchetta)..
  2. On a baking sheet with foil shape 3 football shaped meatloafs.
  3. Wrap meat loaf with porchetta, season with salt on top. Cook at 350 degrees for 20mins covered with foil, after remove foil and cook for another 20 mins. may have to cook longer if you make larger meatloafs..

So that is going to wrap it up with this exceptional food porchetta wrapped turkey meatloaf (keto/low carb) recipe. Thank you very much for your time. I'm sure you can make this at home. There's gonna be interesting food at home recipes coming up. Don't forget to bookmark this page in your browser, and share it to your family, colleague and friends. Thank you for reading. Go on get cooking!

Recipe of Perfect Strawberry and Blueberry Cookies

Recipe of Perfect Strawberry and Blueberry Cookies

Strawberry and Blueberry Cookies.

Strawberry and Blueberry Cookies

Hey everyone, it is Brad, welcome to our recipe page. Today, I'm gonna show you how to make a distinctive dish, strawberry and blueberry cookies. It is one of my favorites food recipes. For mine, I am going to make it a bit unique. This is gonna smell and look delicious.

Strawberry and Blueberry Cookies is one of the most well liked of recent trending foods in the world. It is easy, it's quick, it tastes yummy. It is enjoyed by millions every day. Strawberry and Blueberry Cookies is something that I have loved my entire life. They are fine and they look wonderful.

To begin with this recipe, we must prepare a few components. You can have strawberry and blueberry cookies using 7 ingredients and 12 steps. Here is how you cook that.

The ingredients needed to make Strawberry and Blueberry Cookies:

  1. {Get of Cake flour.
  2. {Get of Almond flour.
  3. {Prepare of Butter (bread margarin).
  4. {Prepare of Granulated sugar.
  5. {Make ready of Egg.
  6. {Prepare of Dried strawberries.
  7. {Take of Dried blueberries.

Instructions to make Strawberry and Blueberry Cookies:

  1. Sift the flour and almond flour together..
  2. Cut the dried strawberries into small pieces. Do the same for dried blueberries that are large..
  3. Put the butter and granulated sugar into a bowl and blend..
  4. Add 1/2 beaten egg (or 1 egg yolk) into the mixture from step 3 and mix well..
  5. Add the sifted ingredients from Step 1 to the Step 4 bowl. Form the dough into a ball by pressing and mixing with a spatula..
  6. Divide the dough from Step 5 into two lumps. Add the dried strawberries into one, dried blueberries into the other and blend them in..
  7. Wrap the two lumps from Step 6 with plastic wrap and let them rest in the fridge for about 2 hours. (You can also make the dough the day before you make bake cookies.).
  8. Preheat the oven to 180℃ (350℉). Put the dough between plastic wraps and roll out to about 4mm thick with a rolling pin..
  9. Cut into shapes with any cookie cutter of your choice. Place cookies on a baking pan lined with parchment paper. Bake about 15 minutes in preheated oven..
  10. The cookies will rise as they bake so they would turn out to about 6mm thick. Once baked, transfer the cookies to cooling racks etc. and let cool..
  11. It's alright if it turns out rather soft; it'll harden over time. It's done once you arrange them nicely and cute-looking on a plate. (The photo shows strawberry cookies.).
  12. You can also roll out the dough into tubes, wrap in plastic wrap, and freeze. Bake after cutting the frozen dough...it's easier this way..

So that's going to wrap it up for this special food strawberry and blueberry cookies recipe. Thanks so much for your time. I'm confident you can make this at home. There's gonna be more interesting food in home recipes coming up. Don't forget to save this page in your browser, and share it to your loved ones, friends and colleague. Thanks again for reading. Go on get cooking!

How to Make Ultimate Ramen noodle coleslaw salad

How to Make Ultimate Ramen noodle coleslaw salad

Ramen noodle coleslaw salad.

Ramen noodle coleslaw salad

Hey everyone, it's me again, Dan, welcome to our recipe page. Today, we're going to make a distinctive dish, ramen noodle coleslaw salad. It is one of my favorites food recipes. This time, I'm gonna make it a bit unique. This will be really delicious.

Ramen noodle coleslaw salad is one of the most well liked of recent trending foods on earth. It is enjoyed by millions every day. It is simple, it is fast, it tastes yummy. They're nice and they look fantastic. Ramen noodle coleslaw salad is something that I've loved my entire life.

To begin with this recipe, we have to first prepare a few components. You can have ramen noodle coleslaw salad using 7 ingredients and 3 steps. Here is how you cook it.

The ingredients needed to make Ramen noodle coleslaw salad:

  1. {Prepare 8 oz of bag of coleslaw.
  2. {Make ready 1 packages of Ramen noodles (save flavoring for later).
  3. {Make ready 1/2 cup of sunflower seeds.
  4. {Take 1/2 cup of oil.
  5. {Get 1/4 cup of cider vinegar.
  6. {Take 1/4 cup of sugar.
  7. {Prepare 1 packages of Ramen noodle flavor packet.

Instructions to make Ramen noodle coleslaw salad:

  1. Mix coleslaw, crushed noodles, & sunflower kernels..
  2. In separate small bowl, mix ramen flavor packet, oil, vinegar, & sugar..
  3. Mix both mixtures together. Place in fridge for 2 hours..

So that is going to wrap it up with this special food ramen noodle coleslaw salad recipe. Thank you very much for reading. I'm sure you will make this at home. There's gonna be interesting food in home recipes coming up. Don't forget to save this page on your browser, and share it to your family, friends and colleague. Thank you for reading. Go on get cooking!

Simple Way to Make Super Quick Homemade Thai Squid Mango Salad

Simple Way to Make Super Quick Homemade Thai Squid Mango Salad

Thai Squid Mango Salad.

Thai Squid Mango Salad

Hey everyone, it's me again, Dan, welcome to my recipe site. Today, we're going to prepare a special dish, thai squid mango salad. It is one of my favorites food recipes. For mine, I will make it a little bit tasty. This is gonna smell and look delicious.

Thai Squid Mango Salad is one of the most favored of recent trending meals on earth. It is enjoyed by millions daily. It's easy, it's quick, it tastes delicious. They're nice and they look fantastic. Thai Squid Mango Salad is something that I've loved my whole life.

To begin with this particular recipe, we must first prepare a few components. You can cook thai squid mango salad using 7 ingredients and 7 steps. Here is how you can achieve it.

The ingredients needed to make Thai Squid Mango Salad:

  1. {Get of Squids.
  2. {Take of Big ripe mango.
  3. {Prepare of Lemon grass.
  4. {Get of Chilli.
  5. {Get of Sweet chilli sauce.
  6. {Prepare of Lime.
  7. {Prepare of bunch of coriander.

Instructions to make Thai Squid Mango Salad:

  1. Cut the squids into squares.
  2. Cut the lemongrass and squash them with mortar and pestle.
  3. Marinate the squids in lemongrass, cubed chillies, a sweet chilli sauce.
  4. Cube the mango and stick it into a big bowl with coriander.
  5. Fry the squid till cooked.
  6. Add the squid I'm the bowl and squeeze in the lemon juice.
  7. Stir well and enjoy !.

So that is going to wrap this up for this exceptional food thai squid mango salad recipe. Thank you very much for reading. I'm sure you will make this at home. There is gonna be interesting food at home recipes coming up. Remember to save this page on your browser, and share it to your loved ones, colleague and friends. Thank you for reading. Go on get cooking!

Recipe of Ultimate super bowl mexican dip

Recipe of Ultimate super bowl mexican dip

super bowl mexican dip.

super bowl mexican dip

Hello everybody, I hope you are having an incredible day today. Today, I'm gonna show you how to make a distinctive dish, super bowl mexican dip. It is one of my favorites food recipes. For mine, I will make it a little bit unique. This is gonna smell and look delicious.

super bowl mexican dip is one of the most well liked of current trending foods in the world. It's appreciated by millions daily. It is easy, it's fast, it tastes yummy. They are nice and they look wonderful. super bowl mexican dip is something that I've loved my entire life.

To get started with this recipe, we must prepare a few components. You can cook super bowl mexican dip using 13 ingredients and 6 steps. Here is how you cook it.

The ingredients needed to make super bowl mexican dip:

  1. {Get 2 can of black beans rinsed.
  2. {Take 2 can of red kidney beans rinsed.
  3. {Make ready 1 large of onion.
  4. {Make ready 1 large of green pepper.
  5. {Make ready 2 small of sour cream.
  6. {Make ready 1 of egg.
  7. {Make ready 1 packages of mozzrella cheese.
  8. {Get 2 packages of sharp chedder.
  9. {Get 2 envelope of taco powder mix.
  10. {Get 3 packages of of ground chicken.
  11. {Get 1/2 of butter.
  12. {Prepare 1 large of salsa.
  13. {Prepare 2 of bags of tortilla chips.

Instructions to make super bowl mexican dip:

  1. cook ground chicken w/ onions & green pepper after the meat is almost dun add the beans.
  2. after that starts to simmer add taco mix with 1/2 cup of water let simmer until liquid is almost gone.
  3. in a large casserole dish layer your meat.
  4. then mix the sour cream, egg & mozzarella cheese mix well together.
  5. then spread it on top of meat layer another layer of meat then the sharp chedder cheese on top/ bake at 350-375. for 20 mins.
  6. let cool serve with chips & salsa on the side.....

So that is going to wrap it up for this exceptional food super bowl mexican dip recipe. Thank you very much for reading. I am confident you will make this at home. There is gonna be interesting food at home recipes coming up. Remember to bookmark this page on your browser, and share it to your family, colleague and friends. Thank you for reading. Go on get cooking!

Recipe of Ultimate Pancit

Recipe of Ultimate Pancit

Pancit. In Filipino cuisine, pancit (also spelt pansít) are noodles and the dishes made from them, typically using rice noodles. Noodles were introduced to the Philippines by Chinese immigrants over the centuries, and have been fully adopted into local cuisine, of which there are now numerous variants and types. Pancit or Pansit are noodles in Filipino.

Pancit 
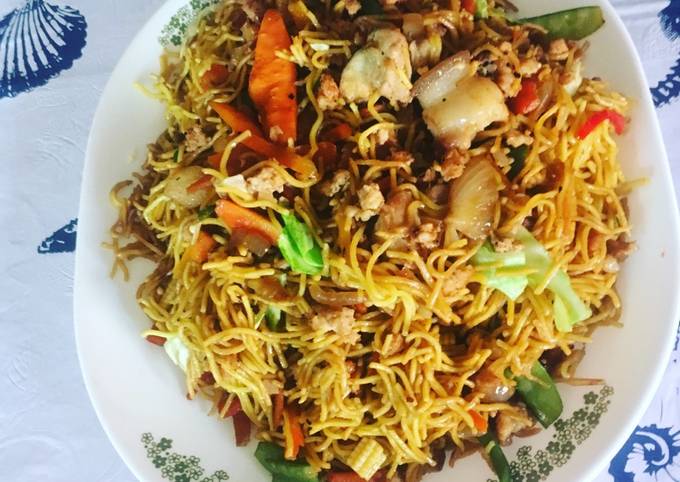
Pancit Bihon or Pancit Guisado is a Filipino noodle dish and is a staple second to rice. This Pancit Bihon Recipe uses "Bihon" or rice sticks mixed with pork, chicken, and vegetables. What is Pancit Bihon (aka: Bihon Pancit)?

Hello everybody, it's John, welcome to our recipe page. Today, we're going to make a distinctive dish, pancit. It is one of my favorites. This time, I will make it a little bit tasty. This will be really delicious.

Pancit is one of the most favored of current trending meals in the world. It is enjoyed by millions daily. It is simple, it is fast, it tastes delicious. Pancit is something that I have loved my whole life. They are fine and they look wonderful.

In Filipino cuisine, pancit (also spelt pansít) are noodles and the dishes made from them, typically using rice noodles. Noodles were introduced to the Philippines by Chinese immigrants over the centuries, and have been fully adopted into local cuisine, of which there are now numerous variants and types. Pancit or Pansit are noodles in Filipino.

To get started with this recipe, we have to first prepare a few components. You can have pancit using 14 ingredients and 4 steps. Here is how you can achieve it.

The ingredients needed to make Pancit:

  1. {Get of Pancit Canton egg noodles I used miki you don’t need to cook anymore.
  2. {Make ready 6 cloves of garlic chopped.
  3. {Prepare 4 of Onions chopped.
  4. {Take strips of Carrots peeled and cut into thin.
  5. {Make ready half of Baby corn cut in the middle then.
  6. {Prepare of Snap peas ends and tops cut.
  7. {Prepare of Cabbage cut in half then core cut of then quartered then shredded.
  8. {Take of Pancit Sauce.
  9. {Get of Soy sauce.
  10. {Take of Oyster Sauce.
  11. {Make ready of Sprinkle sugar.
  12. {Make ready of Pepper.
  13. {Make ready of Sesame oil.
  14. {Get pieces of Pork cut into small.

Pancit is a Filipino dish that usually consists of noodles What is the difference between pancit canton and pancit bihon? Now, while pancit refers to noodles. See more ideas about pancit, pancit recipe, asian recipes. Filipino Bihon Pancit Noodles Recipe - Sweet and savory rice noodles tossed ina a simple soy sauce and cooked with chicken and veggies.

Instructions to make Pancit:

  1. In a hot pan with oil sauté cook meat until brown then set aside. Then sauté garlic until fragrant then add onions cook until translucent but still has a crunch.Stir fry for few minutes.
  2. Then add carrots stir fry, then red and green pepper stir fry then baby carrots and the snap peas stir fry return the meat and stir fry meat and vegetables together add a little pancit sauce and mix..
  3. In another big pan or wok hot and hot oil cook noodles as you would Spaghetti then mix the meat and vegetables and noodles together then add the rest of drizzle the Pancit sauce. Then toss..
  4. Then add on top sprinkle the shredded cabbage. Then serve.

The most common noodle dish found in Filipino homes and restaurants. Toss in noodles, and cook until heated through, stirring constantly. Transfer pancit to a serving dish and garnish with quartered lemons. I love pancit, which means noodles in Filipino language. Just like other Asian cuisines there are several variations of it around the Philippines. *Pancit Cabagan *Pancit Bato *Pancit Bihongundoy *Pancit Canton *Pancit estacion (Tanza, Cavite only) *Pancit Habhab (Lucban, Quezon only) *Pancit Luglog *Pancit Malabon *Pancit Molo *Pancit.

So that is going to wrap this up with this exceptional food pancit recipe. Thank you very much for your time. I'm confident you will make this at home. There is gonna be interesting food in home recipes coming up. Remember to bookmark this page in your browser, and share it to your loved ones, colleague and friends. Thanks again for reading. Go on get cooking!

Step-by-Step Guide to Prepare Perfect Haluski (noodles with cabbage and
onion

Step-by-Step Guide to Prepare Perfect Haluski (noodles with cabbage and onion

Haluski (noodles with cabbage and onion.

Haluski (noodles with cabbage and onion

Hey everyone, hope you are having an amazing day today. Today, I'm gonna show you how to make a special dish, haluski (noodles with cabbage and onion. It is one of my favorites food recipes. For mine, I am going to make it a bit unique. This is gonna smell and look delicious.

Haluski (noodles with cabbage and onion is one of the most favored of current trending foods on earth. It is easy, it's quick, it tastes yummy. It is appreciated by millions daily. Haluski (noodles with cabbage and onion is something which I have loved my whole life. They are nice and they look wonderful.

To begin with this particular recipe, we have to prepare a few components. You can cook haluski (noodles with cabbage and onion using 5 ingredients and 3 steps. Here is how you can achieve that.

The ingredients needed to make Haluski (noodles with cabbage and onion:

  1. {Prepare 1 lb of bag of egg noodle.
  2. {Get 1 medium of head of cabbage.
  3. {Take 2 medium of onions.
  4. {Get 1 of garlic powder or salt to taste.
  5. {Take 1/4 cup of butter.

Instructions to make Haluski (noodles with cabbage and onion:

  1. cook noodles according to directions on package.
  2. cook cabbage and onion with butter and garlic in large skillett until soft.
  3. add cooked noodles to cabbage mixture. add more butter if desired. mix well and serve..

So that is going to wrap it up with this exceptional food haluski (noodles with cabbage and onion recipe. Thanks so much for reading. I am sure that you will make this at home. There is gonna be more interesting food in home recipes coming up. Remember to bookmark this page on your browser, and share it to your loved ones, friends and colleague. Thanks again for reading. Go on get cooking!

Step-by-Step Guide to Prepare Homemade Sick Day Comfort Tacos

Step-by-Step Guide to Prepare Homemade Sick Day Comfort Tacos

Sick Day Comfort Tacos.

Sick Day Comfort Tacos

Hello everybody, it's me again, Dan, welcome to my recipe site. Today, I'm gonna show you how to make a distinctive dish, sick day comfort tacos. One of my favorites food recipes. This time, I am going to make it a bit tasty. This is gonna smell and look delicious.

Sick Day Comfort Tacos is one of the most popular of recent trending foods in the world. It is appreciated by millions every day. It's easy, it is fast, it tastes delicious. Sick Day Comfort Tacos is something that I've loved my entire life. They're nice and they look fantastic.

To begin with this recipe, we must first prepare a few ingredients. You can cook sick day comfort tacos using 6 ingredients and 2 steps. Here is how you cook that.

The ingredients needed to make Sick Day Comfort Tacos:

  1. {Make ready 1 of frozen chicken (yep, straight from the freezer).
  2. {Take of Enough water to still cover the breasts for when it boils gently.
  3. {Take 1 of pile of refrigerated hand-sized tortillas from the plastic bag.
  4. {Get 1 of slowcooker seasoning packet (I used chicken white chili).
  5. {Take 1 of chicken bouillon cube pre-whisked with hot sink tap water.
  6. {Take of TIP: A coriander/strainer to save broth for later meals.

Steps to make Sick Day Comfort Tacos:

  1. Select your meat from the freezer, use foil to cover if lid won't fit due to frozen chicken legs sticking out, put everything in, wait overnight or preferably until the next sundown before eating shredded meat with tortillas and fixings (I used no fixings this time).
  2. This is what I used my drained chicken meat for on the next day or two..

So that is going to wrap this up with this special food sick day comfort tacos recipe. Thanks so much for your time. I'm confident that you can make this at home. There's gonna be interesting food at home recipes coming up. Don't forget to bookmark this page in your browser, and share it to your loved ones, friends and colleague. Thanks again for reading. Go on get cooking!

Easiest Way to Prepare Speedy Amritsari Chole Kulche

Easiest Way to Prepare Speedy Amritsari Chole Kulche

Amritsari Chole Kulche.

Amritsari Chole Kulche

Hello everybody, it's Drew, welcome to our recipe page. Today, I will show you a way to prepare a distinctive dish, amritsari chole kulche. One of my favorites food recipes. For mine, I will make it a little bit tasty. This will be really delicious.

Amritsari Chole Kulche is one of the most favored of current trending meals in the world. It is appreciated by millions every day. It is simple, it's fast, it tastes yummy. They're nice and they look fantastic. Amritsari Chole Kulche is something that I've loved my whole life.

To get started with this particular recipe, we have to first prepare a few ingredients. You can cook amritsari chole kulche using 42 ingredients and 15 steps. Here is how you can achieve that.

The ingredients needed to make Amritsari Chole Kulche:

  1. {Get of (1) For Chole -.
  2. {Prepare 1 Cup of Chickpeas.
  3. {Take 3 Cups of water.
  4. {Prepare as per taste of Salt.
  5. {Take 1/8 TSP of Baking Soda.
  6. {Make ready 1 of Tea Bag.
  7. {Take of (2) For Chole Gravy -.
  8. {Make ready 2 Tbsp of Oil.
  9. {Get 2 of Bay Leaves.
  10. {Make ready 3 of Cinnamon Sticks.
  11. {Make ready 3-4 of Cloves.
  12. {Get 3-4 of Green Cardamoms.
  13. {Make ready 1 TSP of Cumin Seeds.
  14. {Prepare 2 of Onions sliced.
  15. {Get 3 of Tomato finely chopped.
  16. {Take 1 TSP of mashed Ginger.
  17. {Get 5-6 of Garlic Cloves.
  18. {Get as per taste of Salt.
  19. {Get 1/2 TSP of Turmeric powder.
  20. {Prepare 1 TSP of Red Chilli Powder.
  21. {Prepare 2 TSP of Coriander Powder.
  22. {Make ready 1 TSP of Everest Chloe Masala.
  23. {Get of (2) For Kulcha -.
  24. {Make ready 1 Cup of All-purpose Flour.
  25. {Get 1/2 TSP of Baking Powder.
  26. {Take 1/4 TSP of Baking Soda.
  27. {Take as per taste of Salt.
  28. {Get 1/2 TSP of Sugar.
  29. {Prepare 1/4 Cup of Yoghurt.
  30. {Get As required of Oil.
  31. {Prepare as required of Water.
  32. {Take as required of Butter.
  33. {Get As needed- of Chopped coriander leaves.
  34. {Make ready 1/2 TSP of Nigella seeds.
  35. {Make ready of (3) For Kulcha Stuffing.
  36. {Take 1 of Potato Boiled.
  37. {Take as per taste of Salt.
  38. {Prepare 1 TSP of Red Chilli Powder.
  39. {Make ready 1/4 TSP of Turmeric Powder.
  40. {Get 1/2 TSP of Cumin Powder.
  41. {Prepare 1/2 TSP of Aamchur Powder.
  42. {Get as required of Chopped coriander leaves.

Steps to make Amritsari Chole Kulche:

  1. (1) For Chole - First rinse 1 cup white chickpeas a couple of times in water. Then soak overnight or for 7 to 8 hours..
  2. In a pressure cooker add chickpeas, 3 cups water,baking soda, tea bag, salt and boil. Pressure cook chickpeas for 10 to 12 whistles or till they are tender and cooked well..
  3. Once done then drain all the water and keep the cooked chickpeas aside. Remove tea bag..
  4. (2) For Chole Gravy - In a pan heat oil, add ginger, garlic and saute for a minute. Add finely chopped onions and tomatoes and cook well..
  5. Now add Salt, Red Chilli Powder, Turmeric Powder and Coriander Powder and mix well..
  6. Now let it cool down and grind it in mixer and make a fine paste..
  7. Heat 1 Tbsp oil in a pan add bay leaves, cinnamon, green cardamom, cloves and cumin seeds. Sauté for about 2-3 minutes..
  8. Now add smooth paste and cook well for about 5 minutes. Now add Everest Chole Masala and mix well..
  9. Now add boiled chickpeas and adjust water consistency. Close the pan with lid and cook well on low flame for about 10 minutes and garnish it with coriander leaves..
  10. (3) For Kulcha - Prepare dough by mixing all-purpose flour, baking soda, baking powder, salt, sugar, yoghurt and water as required. Keep aside for 2 hours by covering it with muslin cloth..
  11. (4)For Kulcha Stuffing - In a bowl add boiled mashed potatoes, green chilli, red chilli powder, turmeric powder, salt, cumin seed powder, aamchur powder, coriander leaves and mix well..
  12. Take a small portion of dough and make a katori shape like this, add stuffing and close from edges like this..
  13. Sprinkle some nigella seeds, chopped coriander leaves on the ball. With the rolling pin flatten the dough and roll each into a small-sized kulcha on a lightly dusted rolling board..
  14. Apply water on top of kulcha,heat a tawa. The tawa has to be very hot. Place the kulcha on the tawa and let it cook on low flame for 2 minutes and flip the tawa like this nad let it get grilled from top..
  15. Apply butter and cut as desired. Serve with yummy chole, Onion and fried chilli..

So that is going to wrap this up with this exceptional food amritsari chole kulche recipe. Thanks so much for your time. I'm sure you can make this at home. There's gonna be more interesting food in home recipes coming up. Remember to bookmark this page on your browser, and share it to your family, friends and colleague. Thank you for reading. Go on get cooking!

Recipe of Award-winning British (Lancashire) - Oven Bottoms

Recipe of Award-winning British (Lancashire) - Oven Bottoms

British (Lancashire) - Oven Bottoms.

British (Lancashire) - Oven Bottoms

Hello everybody, it is me again, Dan, welcome to our recipe page. Today, we're going to prepare a special dish, british (lancashire) - oven bottoms. One of my favorites food recipes. For mine, I will make it a little bit tasty. This will be really delicious.

British (Lancashire) - Oven Bottoms is one of the most favored of current trending meals on earth. It's enjoyed by millions daily. It's simple, it is quick, it tastes yummy. British (Lancashire) - Oven Bottoms is something that I've loved my whole life. They are nice and they look fantastic.

To get started with this particular recipe, we have to prepare a few ingredients. You can cook british (lancashire) - oven bottoms using 8 ingredients and 8 steps. Here is how you can achieve that.

The ingredients needed to make British (Lancashire) - Oven Bottoms:

  1. {Take of Bread Flour.
  2. {Get of Sugar.
  3. {Prepare of Instant Yeast or 7 Gr.
  4. {Take of Veg Oil.
  5. {Take of Butter.
  6. {Get of Milk.
  7. {Get of Warm Water.
  8. {Take of Salt.

Steps to make British (Lancashire) - Oven Bottoms:

  1. Put Everything in your Stand mixer APART from the milk and water and combine until it looks a bit like fine Breadcrumbs.
  2. Add the Milk warm Water and bring everything together with your hands then tip onto a floured surface and Knead for about 5 mins. or about 3 in a stand mixer - you may need to add a little extra flour if sticking.
  3. Slightly Oil a large bowl and transfer the Dough ball into it will a few more drops of oil and Tightly cover with Clingfilm - Allow to rest for at least 1 hour or until at least double in size..
  4. Flour the work surface and tip out the dough divide into 6 (I do 4 as I love LARGE Sandwiches or can do 8 if prefer "fun Size"). Roll each into a ball and place on a Buttered Baking Sheet - using another baking sheet or anything flat press down so that you flatten the balls - cover with a dry clean Cloth and let them rest for another 30 mins while you pre hear oven to 200c.
  5. Before placing into the Oven slightly flatten them again - so they are around half their thickness..
  6. Traditionally you slightly press your thumb into the centre to make a dent (optional) then bake for 15 mins - turning half way though the cooking.
  7. Allow to cool the slice and add the filling of your choice. I love to toast these too in the morning with lots of butter and Jam - WOWWWWWW !.
  8. Can Freeze for about a month or eat within 3 days - Enjoy..

So that is going to wrap it up for this exceptional food british (lancashire) - oven bottoms recipe. Thanks so much for reading. I am confident that you can make this at home. There is gonna be interesting food in home recipes coming up. Remember to save this page in your browser, and share it to your loved ones, colleague and friends. Thanks again for reading. Go on get cooking!

How to Prepare Super Quick Homemade Chicken fried chicken w/ roasted
garlic mushroom gravy

How to Prepare Super Quick Homemade Chicken fried chicken w/ roasted garlic mushroom gravy

Chicken fried chicken w/ roasted garlic mushroom gravy.

Chicken fried chicken w/ roasted garlic mushroom gravy

Hey everyone, I hope you are having an incredible day today. Today, I'm gonna show you how to make a special dish, chicken fried chicken w/ roasted garlic mushroom gravy. One of my favorites. This time, I'm gonna make it a bit unique. This will be really delicious.

Chicken fried chicken w/ roasted garlic mushroom gravy is one of the most popular of recent trending meals on earth. It is simple, it is fast, it tastes yummy. It is appreciated by millions every day. Chicken fried chicken w/ roasted garlic mushroom gravy is something that I have loved my entire life. They're nice and they look wonderful.

To get started with this recipe, we have to first prepare a few ingredients. You can have chicken fried chicken w/ roasted garlic mushroom gravy using 17 ingredients and 3 steps. Here is how you can achieve it.

The ingredients needed to make Chicken fried chicken w/ roasted garlic mushroom gravy:

  1. {Prepare of wheat flour.
  2. {Make ready of butter.
  3. {Make ready of olive oil.
  4. {Take of fresh mushrooms.
  5. {Take of small onion (red or yellow).
  6. {Get of garlic (roasted).
  7. {Get of boneless skinless chicken breast (cut in half).
  8. {Take of whole milk.
  9. {Get of Gourmet Fournet Roasted garlic creole onion dip.
  10. {Take of salt.
  11. {Take of pepper.
  12. {Get of Tony Chacheries original creole seasoning.
  13. {Get of garlic powder.
  14. {Get of onion powder.
  15. {Prepare of penne pasta.
  16. {Get of your favorite brown gravy.
  17. {Prepare of water.

Steps to make Chicken fried chicken w/ roasted garlic mushroom gravy:

  1. Thinly sliced chicken breast in half. Trimming the fat off also. Mix flour, salt, pepper and 1 tablespoon of creole seasoning. Lightly coat chicken, then dip chicken in milk. Meanwhile, heat large skillet on medium heat. Then, Start heating 1 tablespoon of butter mixed with 1 tablespoon of olive oil. When oil and butter are heating up, coat chicken in seasoned flour for a second time. Place chicken in skillet for 6 minutes on each side or until the internal temperature is 165 degrees..
  2. In the same skillet the chicken was pan fried in melt 1/2 stick of butter, onion and garlic then Add freshly sliced mushrooms and sauté. When mushrooms are finished cooking add 1 cup of brown gravy and heat. Once your gravy is done take a tablespoon at a time and mix with 2 oz of Gourmet Fournet Roasted garlic creole onion dip until dip is warm enough to mix with gravy..
  3. Bring 6 cups of water to a boil. Add 1 tablespoon of salt, then add 6 oz of penne pasta. Boil for 7 minutes or desired tenderness. Drain. Toss penne with remaining butter from recipe..

So that's going to wrap it up with this special food chicken fried chicken w/ roasted garlic mushroom gravy recipe. Thank you very much for reading. I am confident you can make this at home. There's gonna be more interesting food at home recipes coming up. Remember to save this page in your browser, and share it to your family, colleague and friends. Thank you for reading. Go on get cooking!

Recipe of Any-night-of-the-week Rich & Hearty Cauliflower Potatoes

Recipe of Any-night-of-the-week Rich & Hearty Cauliflower Potatoes

Rich & Hearty Cauliflower Potatoes. Перевод слова rich, американское и британское произношение, транскрипция, словосочетания, однокоренные слова, примеры использования. Rich may refer to: Rich, an entity possessing cash. Rich, an intense flavor, color, sound, texture, or feeling.

Rich & Hearty Cauliflower Potatoes Rich definition, having wealth or great possessions; abundantly supplied with resources, means, or funds; wealthy: a rich man;a rich nation. Sicilian vineyards, luxurious beaches of Sardinia. Rich's inspires possibilities with high quality, wholesale food products and ingredients that can be found in commercial kitchens in all corners of the globe.

Hello everybody, hope you're having an incredible day today. Today, we're going to prepare a special dish, rich & hearty cauliflower potatoes. It is one of my favorites. For mine, I will make it a little bit tasty. This will be really delicious.

Rich & Hearty Cauliflower Potatoes is one of the most popular of recent trending meals on earth. It's simple, it's quick, it tastes delicious. It's appreciated by millions daily. They are nice and they look wonderful. Rich & Hearty Cauliflower Potatoes is something that I have loved my whole life.

Перевод слова rich, американское и британское произношение, транскрипция, словосочетания, однокоренные слова, примеры использования. Rich may refer to: Rich, an entity possessing cash. Rich, an intense flavor, color, sound, texture, or feeling.

To begin with this particular recipe, we must prepare a few ingredients. You can cook rich & hearty cauliflower potatoes using 15 ingredients and 9 steps. Here is how you cook that.

The ingredients needed to make Rich & Hearty Cauliflower Potatoes:

  1. {Take of Yellow Cauilflower.
  2. {Make ready of Russet Potatoes.
  3. {Prepare of unsalted butter.
  4. {Make ready of olive oil, extra virgin.
  5. {Prepare of white onion.
  6. {Get of red pepper flakes.
  7. {Make ready of Better Than Bouillon Vegetable Base.
  8. {Take of Better Than Bouillon Chicken Base.
  9. {Take of water.
  10. {Prepare of garlic.
  11. {Take of chopped green onion.
  12. {Make ready of sour cream.
  13. {Make ready of cream cheese.
  14. {Get of Seasoned Salt.
  15. {Make ready of grated parmesan cheese.

Steps to make Rich & Hearty Cauliflower Potatoes:

  1. Cover potatoes with water in a pot and bring to boil for 20 minutes. Preheat an oven at 475°F.
  2. In 2 1/2 quart casserole dish add half the butter, red pepper flakes, white onion roughly chopped, bouillon base and water. Optionally add a splash of dry white wine. Microwave mixture on high 30-45 seconds until butter melts..
  3. Wash cauliflower. Remove leaves and cut off majority of stalk so that the head stays intact and sits flat. Place in dish, drizzle on half the Olive oil, cover and microwave 5 minutes. Flip head upside down and microwave for another 5 minutes then flip back over..
  4. Peel and halve garlic cloves. Remove potatoes and cut into eighths leaving skins on. Add garlic and potatoes to cauli dish..
  5. Drizzle on remaining olive oil. Cover dish with aluminum foil and place in hot oven. Bake for 30-45 minutes..
  6. Using a knife cut up cauli head into chunks in dish. Then mash the whole mixture together with a masher or large fork..
  7. Add remaining butter, sour cream, cream cheese, parmesan, half the green onion and a dash of salt. Mix thoroughly..
  8. Spread mixture into an even layer. Place under a broiler for 2-3 minutes, watch carefully..
  9. Sprinkle remaining green onion on top and serve..

So that is going to wrap this up with this exceptional food rich & hearty cauliflower potatoes recipe. Thanks so much for reading. I'm confident you can make this at home. There's gonna be interesting food in home recipes coming up. Don't forget to bookmark this page in your browser, and share it to your family, colleague and friends. Thank you for reading. Go on get cooking!

Recipe of Ultimate Fried Rice Noodle (Bihun Goreng) *Vegetarian/Vegan

Recipe of Ultimate Fried Rice Noodle (Bihun Goreng) *Vegetarian/Vegan

Fried Rice Noodle (Bihun Goreng) *Vegetarian/Vegan.

Fried Rice Noodle (Bihun Goreng) *Vegetarian/Vegan

Hey everyone, it's Drew, welcome to our recipe site. Today, we're going to prepare a distinctive dish, fried rice noodle (bihun goreng) *vegetarian/vegan. One of my favorites. This time, I am going to make it a bit unique. This will be really delicious.

Fried Rice Noodle (Bihun Goreng) *Vegetarian/Vegan is one of the most well liked of current trending meals on earth. It is simple, it is fast, it tastes yummy. It is appreciated by millions every day. They are nice and they look fantastic. Fried Rice Noodle (Bihun Goreng) *Vegetarian/Vegan is something that I have loved my entire life.

To get started with this recipe, we must prepare a few components. You can cook fried rice noodle (bihun goreng) *vegetarian/vegan using 11 ingredients and 8 steps. Here is how you can achieve it.

The ingredients needed to make Fried Rice Noodle (Bihun Goreng) *Vegetarian/Vegan:

  1. {Make ready 200 gr of rice noodle.
  2. {Take 4 of garlic cloves.
  3. {Prepare 1 of red onions.
  4. {Take 3 of carrots.
  5. {Prepare 2 of spring onions.
  6. {Make ready 200 gr of cabbage.
  7. {Take 2 of eggs (optional).
  8. {Take 1 tsp of salt.
  9. {Prepare 1 tsp of pepper.
  10. {Prepare 2 tbsp of cooking oil.
  11. {Get of Hot water to soak rice noodle.

Instructions to make Fried Rice Noodle (Bihun Goreng) *Vegetarian/Vegan:

  1. Soak rice noodle with hot water for 3-5 mins, drain the water, put aside..
  2. Grate carrots, chop spring onions, and cabbage, put aside..
  3. Mash red onion and garlic, pit it aside..
  4. Pre-heat sauce pan, pour cooking oil, put mashed onion and garlic in, stir them until the aroma comes out..
  5. Push the onion and garlic to the side, crack eggs in the other side of sauce pan, scramble it until its cooked, and mix it with onion and garlic together..
  6. Add grated carrot, chopped cabbage, and spring onion, mix it well, wait until they are cooked well, add salt and pepper, mix well..
  7. Add rice noodle gradually, mix it with 2 forks until blends and mixed peoperly, taste it before turning off the fire..
  8. Enjoy while hot :D.

So that's going to wrap it up with this special food fried rice noodle (bihun goreng) *vegetarian/vegan recipe. Thank you very much for your time. I am sure that you can make this at home. There is gonna be interesting food in home recipes coming up. Don't forget to bookmark this page on your browser, and share it to your loved ones, colleague and friends. Thanks again for reading. Go on get cooking!

Steps to Make Speedy Tuna Poke Recipe | Hawaiian Ahi Poke

Steps to Make Speedy Tuna Poke Recipe | Hawaiian Ahi Poke

Tuna Poke Recipe | Hawaiian Ahi Poke.

Tuna Poke Recipe | Hawaiian Ahi Poke

Hey everyone, it is Jim, welcome to our recipe page. Today, we're going to prepare a distinctive dish, tuna poke recipe | hawaiian ahi poke. It is one of my favorites food recipes. For mine, I'm gonna make it a little bit tasty. This is gonna smell and look delicious.

Hawaiian Ahi Poke is one of the most favored of current trending meals in the world. It's enjoyed by millions daily. It's easy, it is fast, it tastes yummy. Tuna Poke Recipe

To begin with this particular recipe, we have to prepare a few ingredients. You can have tuna poke recipe | hawaiian ahi poke using 9 ingredients and 7 steps. Here is how you can achieve that.

The ingredients needed to make Tuna Poke Recipe | Hawaiian Ahi Poke:

  1. {Make ready of sashimi-grade tuna.
  2. {Get of sliced green onion.
  3. {Take of sliced red onion, (or yellow onion).
  4. {Get of dried seaweed.
  5. {Get of to 2 tbsp light-color soy sauce (Use Tamari sauce or gluten-free soy sauce if you have gluten allergy).
  6. {Take of sesame oil.
  7. {Take of white and black roasted sesame seeds.
  8. {Take of cucumber cubes (optional).
  9. {Prepare of hot chili oil or sriracha (optional).

Instructions to make Tuna Poke Recipe | Hawaiian Ahi Poke:

  1. Soak dried seaweed in water for a few minutes. Squeeze out all of the excess water and set aside..
  2. Cut the tuna into 3/4″ cubes.
  3. Thinly slice green onion and red onion.
  4. In a large mixing bowl, add tuna, green onion, red onion, seaweed, soy sauce, sesame oil, and roasted sesame seeds. Mix everything together. You can also add some hot chili oil or sriracha and cucumber cubes..
  5. After mixing, let tuna sit in refrigerator for 1/2 hour before serving so tuna is infused with all the flavors.
  6. To serve tuna poke with rice, add a few lettuce leaves on a bed of rice then place poke on top of it. You can also present tuna poke in Asian soup spoons and serve it as an appetizer..
  7. .

So that is going to wrap it up with this special food tuna poke recipe | hawaiian ahi poke recipe. Thank you very much for reading. I'm sure you can make this at home. There's gonna be interesting food at home recipes coming up. Don't forget to bookmark this page on your browser, and share it to your loved ones, friends and colleague. Thank you for reading. Go on get cooking!

Simple Way to Make Any-night-of-the-week Yummy Vegetable lo mein

Simple Way to Make Any-night-of-the-week Yummy Vegetable lo mein

Yummy Vegetable lo mein.

Yummy Vegetable lo mein

Hey everyone, it's Brad, welcome to my recipe site. Today, we're going to prepare a special dish, yummy vegetable lo mein. One of my favorites. This time, I will make it a bit unique. This is gonna smell and look delicious.

Yummy Vegetable lo mein is one of the most favored of recent trending meals in the world. It's enjoyed by millions every day. It's easy, it is fast, it tastes delicious. They're nice and they look wonderful. Yummy Vegetable lo mein is something which I've loved my whole life.

To get started with this recipe, we must first prepare a few components. You can cook yummy vegetable lo mein using 22 ingredients and 4 steps. Here is how you cook it.

The ingredients needed to make Yummy Vegetable lo mein:

  1. {Get of #Sauce#.
  2. {Make ready 2 cups of chicken flavor soup base mix or chicken broth.
  3. {Make ready 1/6 cup of light soy sauce.
  4. {Take 1/4 cup of mushroom flavored dark soy sauce.
  5. {Prepare 1 table spoon of Hoisin sauce.
  6. {Prepare 1 table spoon of oyster flavored sauce.
  7. {Get 2 table spoon of sesame oil.
  8. {Make ready Dash of white peppers.
  9. {Prepare 1 table spoon of brown sugar.
  10. {Prepare 1 table spoon of or as your taste Sriracha sauce.
  11. {Get of #Vegetable of your choice#.
  12. {Get 2 teaspoon of minced garlic.
  13. {Take 1 teaspoon of minced ginger.
  14. {Prepare 1 pound of spaghetti or egg lo mein noodle.
  15. {Make ready of Sesame seeds (optional).
  16. {Get of green onion.
  17. {Make ready of Matchsticks carrot.
  18. {Make ready of Shiitake mushrooms.
  19. {Get of Bamboo shoots.
  20. {Make ready of Beans sprouts.
  21. {Get of Napa cabbage.
  22. {Get of Spinach or chives (Nira).

Steps to make Yummy Vegetable lo mein:

  1. In the bowl make your sauce with first 9 ingredients and set aside..
  2. Cooking oil in the skillet heated with garlic and ginger. Add green onion,shiitake and carrots for about 2 min..
  3. Add rest of your favorite vegetables except beans sprouts (I like mine crunchy) and cook for 3 min then add cooked noodle and beans sprouts..
  4. Pour sauce over and mix well. Cut heat off, sprinkle sesame seed and serve 😋.

So that is going to wrap it up with this special food yummy vegetable lo mein recipe. Thank you very much for reading. I'm confident that you can make this at home. There's gonna be interesting food at home recipes coming up. Remember to save this page on your browser, and share it to your loved ones, friends and colleague. Thank you for reading. Go on get cooking!

Easiest Way to Prepare Any-night-of-the-week Homemade Ricotta Ravioli
with Sunday Sauce

Easiest Way to Prepare Any-night-of-the-week Homemade Ricotta Ravioli with Sunday Sauce

Homemade Ricotta Ravioli with Sunday Sauce.

Homemade Ricotta Ravioli with Sunday Sauce

Hello everybody, I hope you're having an incredible day today. Today, I'm gonna show you how to make a special dish, homemade ricotta ravioli with sunday sauce. It is one of my favorites food recipes. This time, I will make it a little bit unique. This is gonna smell and look delicious.

Homemade Ricotta Ravioli with Sunday Sauce is one of the most popular of recent trending foods in the world. It's appreciated by millions every day. It's easy, it is fast, it tastes yummy. They are fine and they look fantastic. Homemade Ricotta Ravioli with Sunday Sauce is something that I have loved my entire life.

To get started with this recipe, we must prepare a few ingredients. You can cook homemade ricotta ravioli with sunday sauce using 7 ingredients and 6 steps. Here is how you cook that.

The ingredients needed to make Homemade Ricotta Ravioli with Sunday Sauce:

  1. {Take of Dough, thin ( nice again I make my own dough,.
  2. {Get of Pasta sauce (you can use what you want, I make mine, I will share those recipes).
  3. {Prepare of Ricotta.
  4. {Prepare of Fresh basil.
  5. {Make ready of Salt n pepper.
  6. {Make ready of Dried oregano.
  7. {Prepare of Frosting.

Steps to make Homemade Ricotta Ravioli with Sunday Sauce:

  1. First you need to make your dough everybody makes their Dow different so if you want my recipe you’re gonna have to check out the attachment I have to put that up there otherwise you can just buy some good pizza dough at the store and work it out real thin try to get her a Tangler shaped if you can.
  2. Once the dough is the desired thickness and shape I try to keep it symmetrical because I like to do 2“ x 2“ raviolis do you want to section out your squares after you cut your sheet and in half.
  3. Place a dollop of ricotta in the center of each 2 x 2 square then cover it with the other half of the dough cut vertically and horizontally next Crimp the edges of each ravioli with a fork.
  4. Now for the pasta sauce once again I make my own if you make your own sweet! so my pasta sauce will already be done that usually takes up a pretty good chunk of time along with doing the Dough that takes a lot of work to.
  5. So simply put at this point you should have finished raviolis in boiling water and warm pasta sauce next grab a dish with a nice bottom strain your raviolis do not rinse them reply them in the pan put them right into the dish top with warm Sunday sauce then give it a nice sprinkle of dried oregano and topped with some basil.
  6. You can check out my recipes for my Sunday sauce and my pasta dough.

So that's going to wrap it up with this exceptional food homemade ricotta ravioli with sunday sauce recipe. Thank you very much for your time. I am confident you can make this at home. There's gonna be more interesting food in home recipes coming up. Don't forget to save this page in your browser, and share it to your family, colleague and friends. Thank you for reading. Go on get cooking!

Easiest Way to Make Favorite Banana - chocolate cake

Easiest Way to Make Favorite Banana - chocolate cake

Banana - chocolate cake.

Banana - chocolate cake

Hey everyone, it is me, Dave, welcome to my recipe site. Today, we're going to make a special dish, banana - chocolate cake. One of my favorites. For mine, I'm gonna make it a little bit unique. This is gonna smell and look delicious.

Banana - chocolate cake is one of the most popular of recent trending foods in the world. It's appreciated by millions daily. It's simple, it is fast, it tastes delicious. Banana - chocolate cake is something which I have loved my entire life. They are fine and they look fantastic.

To get started with this particular recipe, we have to prepare a few ingredients. You can have banana - chocolate cake using 10 ingredients and 8 steps. Here is how you cook it.

The ingredients needed to make Banana - chocolate cake:

  1. {Prepare of bananas.
  2. {Prepare of whipping cream.
  3. {Make ready of granulated sugar.
  4. {Take of eggs.
  5. {Prepare of rum.
  6. {Get of all-purpose flour.
  7. {Take of cornstarch.
  8. {Get of baking powder.
  9. {Get of dark chocolate.
  10. {Get of unsalted butter.

Instructions to make Banana - chocolate cake:

  1. Mash bananas and whipping cream with à fork or a processor..
  2. Preheat the oven at 180°C..
  3. Whisk eggs and sugar until fluffy in a large cooking bowl..
  4. Add rum, flour, cornstarch and baking powder. Mix well..
  5. Melt chocolate and butter in a bowl and mix them together..
  6. Add mashed bananas and the chocolate mixture to the dough. Mix well..
  7. Bake in a greased cake pan for 30 min..
  8. Decorate with confectionner's sugar and banana slices. 🍌.

So that is going to wrap it up with this special food banana - chocolate cake recipe. Thanks so much for reading. I'm sure you can make this at home. There's gonna be interesting food in home recipes coming up. Remember to save this page in your browser, and share it to your loved ones, friends and colleague. Thanks again for reading. Go on get cooking!

Steps to Prepare Perfect Hot Sausage & Potato Soup

Steps to Prepare Perfect Hot Sausage & Potato Soup

Hot Sausage & Potato Soup.

Hot Sausage & Potato Soup

Hello everybody, I hope you're having an incredible day today. Today, I'm gonna show you how to prepare a distinctive dish, hot sausage & potato soup. It is one of my favorites. This time, I will make it a little bit tasty. This will be really delicious.

Hot Sausage & Potato Soup is one of the most well liked of current trending foods on earth. It is easy, it's fast, it tastes delicious. It is appreciated by millions every day. Hot Sausage & Potato Soup is something that I've loved my entire life. They're fine and they look fantastic.

To get started with this recipe, we have to prepare a few components. You can have hot sausage & potato soup using 8 ingredients and 5 steps. Here is how you cook it.

The ingredients needed to make Hot Sausage & Potato Soup:

  1. {Take of Hot Sausage.
  2. {Get of yellow onion (diced).
  3. {Make ready of russet potatoes (pennies).
  4. {Prepare of large cloves garlic (grated).
  5. {Take of low-sodium chicken broth.
  6. {Get of kale (1 inch chopped).
  7. {Get of salt.
  8. {Make ready of ground thyme.

Instructions to make Hot Sausage & Potato Soup:

  1. Sauté onion and garlic in olive oil.
  2. Brown sausage, then add chicken broth and bring to boil.
  3. Add potatoes and kale and simmer for 5 minutes.
  4. Add 8oz heavy cream, 1 tsp thyme, 1 tsp salt and simmer for 5 minutes.
  5. Serve hot! (Preferably with bread 😉).

So that's going to wrap this up with this special food hot sausage & potato soup recipe. Thanks so much for your time. I'm sure you can make this at home. There's gonna be more interesting food at home recipes coming up. Don't forget to save this page on your browser, and share it to your loved ones, colleague and friends. Thank you for reading. Go on get cooking!

Recipe of Homemade Bacon and Honey BBQ Meatloaf

Recipe of Homemade Bacon and Honey BBQ Meatloaf

Bacon and Honey BBQ Meatloaf.

Bacon and Honey BBQ Meatloaf

Hello everybody, hope you are having an incredible day today. Today, I will show you a way to prepare a distinctive dish, bacon and honey bbq meatloaf. One of my favorites. For mine, I will make it a bit tasty. This will be really delicious.

Bacon and Honey BBQ Meatloaf is one of the most well liked of current trending foods in the world. It's appreciated by millions daily. It is easy, it's quick, it tastes yummy. They're fine and they look fantastic. Bacon and Honey BBQ Meatloaf is something that I've loved my entire life.

To begin with this recipe, we must prepare a few components. You can have bacon and honey bbq meatloaf using 7 ingredients and 6 steps. Here is how you can achieve it.

The ingredients needed to make Bacon and Honey BBQ Meatloaf:

  1. {Take of ground beef.
  2. {Get of bread crumbs.
  3. {Prepare of BBQ sauce.
  4. {Get of honey.
  5. {Make ready of small to medium onion (diced).
  6. {Make ready of bacon.
  7. {Get of eggs.

Steps to make Bacon and Honey BBQ Meatloaf:

  1. Preheat over to 350 degrees.
  2. In large bowl: mix bread crumbs, ground beef, eggs, BBQ sauce, honey and diced onion..
  3. Spray non-stick spray in a loaf pan. Put contents of bowl into the loaf pan and flatten out top of loaf. Place pan in larger pan if afraid of grease overflow..
  4. Place strips of bacon lengthwise on top of loaf until the loaf is covered..
  5. Place in oven for 45-55 minutes..
  6. Serve hot with favorite veggie on the side..

So that is going to wrap this up for this special food bacon and honey bbq meatloaf recipe. Thank you very much for reading. I am confident that you will make this at home. There is gonna be more interesting food in home recipes coming up. Remember to bookmark this page in your browser, and share it to your loved ones, friends and colleague. Thanks again for reading. Go on get cooking!

Easiest Way to Make Favorite Taro and sweet potato congee (dessert)

Easiest Way to Make Favorite Taro and sweet potato congee (dessert)

Taro and sweet potato congee (dessert).

Taro and sweet potato congee (dessert)

Hey everyone, hope you are having an incredible day today. Today, we're going to prepare a special dish, taro and sweet potato congee (dessert). It is one of my favorites. This time, I am going to make it a bit tasty. This is gonna smell and look delicious.

Taro and sweet potato congee (dessert) is one of the most favored of recent trending meals on earth. It is appreciated by millions daily. It's simple, it's fast, it tastes delicious. They are fine and they look fantastic. Taro and sweet potato congee (dessert) is something which I have loved my whole life.

To begin with this particular recipe, we must prepare a few components. You can cook taro and sweet potato congee (dessert) using 8 ingredients and 4 steps. Here is how you can achieve it.

The ingredients needed to make Taro and sweet potato congee (dessert):

  1. {Prepare of large taro diced into big chunks and steam for 10 minute.
  2. {Make ready of Fresh coconut milk of 1 coconut (milk it to app. 1.5 litre).
  3. {Take of Panda leaves for fragrant.
  4. {Get of cob of corn dettach from cob.
  5. {Take of Tapioka pearls (cooked).
  6. {Take of Purple sweet potato diced.
  7. {Take of Sweet potato (yellow) diced.
  8. {Prepare of Castor sugar enough for sweetness.

Instructions to make Taro and sweet potato congee (dessert):

  1. Bring your pandan and coconut milk to boil on a low heat, (keep stirring to avoid your coconut milk fat from separate from the liquid). Add the purple sweet potato and yellow potato cook until soft. Keep stirring..
  2. Add the taro chunks, corn and sugar (taste it look for sweet creamy taste) and tapioka pearls cook until soft congee consistency. Put the heat off when it's done..
  3. Serve while it's hot or put ice cubes before you serve (i like mine in the fridge before i eat them)..
  4. Tips : you can subtitute your tapioka pearls with chia pudding. Just add it on the final step after the heat is off, stir to combine..

So that's going to wrap it up for this exceptional food taro and sweet potato congee (dessert) recipe. Thanks so much for reading. I am sure you can make this at home. There's gonna be interesting food at home recipes coming up. Remember to bookmark this page in your browser, and share it to your loved ones, friends and colleague. Thank you for reading. Go on get cooking!

Recipe of Any-night-of-the-week Bite-Sized Sushi for Parties

Recipe of Any-night-of-the-week Bite-Sized Sushi for Parties

Bite-Sized Sushi for Parties.

Bite-Sized Sushi for Parties

Hey everyone, I hope you're having an incredible day today. Today, I will show you a way to prepare a special dish, bite-sized sushi for parties. One of my favorites. This time, I'm gonna make it a bit unique. This is gonna smell and look delicious.

Bite-Sized Sushi for Parties is one of the most popular of current trending foods in the world. It's enjoyed by millions every day. It is simple, it is fast, it tastes yummy. They're fine and they look fantastic. Bite-Sized Sushi for Parties is something that I have loved my entire life.

To get started with this particular recipe, we have to prepare a few ingredients. You can have bite-sized sushi for parties using 13 ingredients and 6 steps. Here is how you can achieve it.

The ingredients needed to make Bite-Sized Sushi for Parties:

  1. {Prepare of ★Egg.
  2. {Make ready of ★Sugar.
  3. {Make ready of ★Water.
  4. {Prepare of ○Pre-seasoned aburaage.
  5. {Take of ○Sesame seeds.
  6. {Prepare of ☆Smoked salmon.
  7. {Prepare of ●Avocado.
  8. {Prepare of ●Imitation crab sticks.
  9. {Make ready of ●Cream cheese.
  10. {Make ready of sheet ●Nori seaweed.
  11. {Prepare of ●Mayonnaise.
  12. {Get of Plain cooked rice.
  13. {Prepare of Sushi vinegar.

Instructions to make Bite-Sized Sushi for Parties:

  1. Add sushi vinegar to hot cooked rice and mix well. Set aside to cool..
  2. Egg sushi: Combine all ingredients and make scrambled eggs in a pan. Inari Sushi: Open up the atsuage and slice into two. Salmon Sushi: Chop the salmon into 5 cm-sized pieces. California Rolls: Slice the avocado and cream cheese into 1 cm sticks..
  3. Place the egg, inari, and salmon sushi on plastic wrap. Top on rice rolled into balls. Gather the corners of the wrap into the center and squeeze to make a ball-sized sushi. The photo shows my arrangement for Christmas..
  4. For the California rolls: Place the nori on plastic wrap. Spread the rice on top..
  5. Flip it over. With the nori facing up, top with all ingredients and roll it up with your sushi mat. Set it aside for the ingredients to settle down, then slice into sixths..
  6. Arrange and serve..

So that is going to wrap it up with this special food bite-sized sushi for parties recipe. Thanks so much for reading. I'm sure you will make this at home. There is gonna be interesting food at home recipes coming up. Don't forget to bookmark this page in your browser, and share it to your loved ones, colleague and friends. Thanks again for reading. Go on get cooking!

How to Make Perfect Mango salad (for diet)

How to Make Perfect Mango salad (for diet)

Mango salad (for diet).

Mango salad (for diet)

Hello everybody, it is Louise, welcome to my recipe site. Today, I will show you a way to make a special dish, mango salad (for diet). It is one of my favorites. For mine, I'm gonna make it a little bit unique. This will be really delicious.

Mango salad (for diet) is one of the most well liked of current trending foods on earth. It is simple, it is quick, it tastes yummy. It is appreciated by millions daily. They're fine and they look wonderful. Mango salad (for diet) is something which I have loved my whole life.

To get started with this recipe, we have to first prepare a few ingredients. You can cook mango salad (for diet) using 9 ingredients and 2 steps. Here is how you can achieve that.

The ingredients needed to make Mango salad (for diet):

  1. {Make ready of Mango cube 1/2 cup.
  2. {Make ready of Onion (thin sliced).
  3. {Prepare of Capsicum (thin sliced)1.
  4. {Prepare of Coriander leave.
  5. {Get of Mint.
  6. {Prepare of Sambal oelek (chilli pastel) a pinch of...bcz it's too spicy.
  7. {Make ready of caster sugar.
  8. {Prepare of salt.
  9. {Make ready of For garnish red jalapeno and alomds.

Instructions to make Mango salad (for diet):

  1. Mix all the ingredients in a bowl And garnish with red jalapenos.
  2. Serve cold.

So that's going to wrap this up for this special food mango salad (for diet) recipe. Thank you very much for reading. I'm confident you can make this at home. There is gonna be interesting food at home recipes coming up. Remember to bookmark this page in your browser, and share it to your loved ones, friends and colleague. Thank you for reading. Go on get cooking!

Recipe of Any-night-of-the-week Tasty Cheese and Soy Sauce Pasta

Recipe of Any-night-of-the-week Tasty Cheese and Soy Sauce Pasta

Tasty Cheese and Soy Sauce Pasta.

Tasty Cheese and Soy Sauce Pasta

Hey everyone, it is Louise, welcome to our recipe site. Today, we're going to make a special dish, tasty cheese and soy sauce pasta. It is one of my favorites food recipes. This time, I will make it a bit tasty. This is gonna smell and look delicious.

Tasty Cheese and Soy Sauce Pasta is one of the most popular of recent trending meals on earth. It is enjoyed by millions daily. It's simple, it is quick, it tastes yummy. Tasty Cheese and Soy Sauce Pasta is something that I've loved my entire life. They're nice and they look wonderful.

To get started with this recipe, we must prepare a few components. You can have tasty cheese and soy sauce pasta using 10 ingredients and 8 steps. Here is how you cook it.

The ingredients needed to make Tasty Cheese and Soy Sauce Pasta:

  1. {Take of Spaghetti.
  2. {Get of Bacon.
  3. {Take of Okra.
  4. {Make ready of ☆ Kraft brand's Parmesan cheese.
  5. {Prepare of ☆ Soy sauce.
  6. {Make ready of ☆ Mirin.
  7. {Prepare of ☆ Mayonnaise.
  8. {Make ready of ☆ Sugar.
  9. {Prepare of ☆ Grated garlic.
  10. {Take of Coarsely ground black pepper.

Steps to make Tasty Cheese and Soy Sauce Pasta:

  1. Sprinkle some salt (not listed) on the okra, rub with your hand, and briefly blanch in boiling water. Cool in cold water and cut them into 2-3 mm slices..
  2. Cut the bacon into 1 cm wide pieces..
  3. Combine the ☆ ingredients together..
  4. Boil a potful of water, add the amount of the salt directed on the package, and cook the spaghetti noodles..
  5. Heat a skillet, add a small amount of olive oil (not listed), and sauté the bacon. Wipe excess oil with paper towels..
  6. Briskly mix the boiled spaghetti noodles and the ☆ mixture. Add about 3 tablespoons of cooking liquid..
  7. Serve the noodles onto a plate, sprinkle with coarsely ground black pepper, top with okra and enjoy ♬.
  8. This is the Kraft brand parmesan cheese that I used..

So that is going to wrap it up for this exceptional food tasty cheese and soy sauce pasta recipe. Thanks so much for reading. I am confident you will make this at home. There is gonna be more interesting food in home recipes coming up. Don't forget to bookmark this page on your browser, and share it to your family, colleague and friends. Thank you for reading. Go on get cooking!

Steps to Prepare Favorite Mango apple salad#author marathon#

Steps to Prepare Favorite Mango apple salad#author marathon#

Mango apple salad#author marathon#.

Mango apple salad#author marathon#

Hey everyone, it is me, Dave, welcome to our recipe page. Today, we're going to make a distinctive dish, mango apple salad#author marathon#. It is one of my favorites. For mine, I am going to make it a little bit tasty. This is gonna smell and look delicious.

Mango apple salad#author marathon# is one of the most popular of recent trending meals on earth. It's simple, it's fast, it tastes delicious. It's enjoyed by millions daily. They're nice and they look wonderful. Mango apple salad#author marathon# is something that I have loved my entire life.

To begin with this particular recipe, we have to prepare a few components. You can cook mango apple salad#author marathon# using 2 ingredients and 1 steps. Here is how you can achieve it.

The ingredients needed to make Mango apple salad#author marathon#:

  1. {Make ready of mangoes(very ripe).
  2. {Make ready of apples.

Instructions to make Mango apple salad#author marathon#:

  1. Wash and peel the mango,cut into small cubes.cut the apples into cubes.mix in a serving ball.put in a fridge for 30 min.serve..

So that's going to wrap this up for this special food mango apple salad#author marathon# recipe. Thank you very much for your time. I am confident you will make this at home. There is gonna be more interesting food in home recipes coming up. Remember to bookmark this page in your browser, and share it to your family, colleague and friends. Thanks again for reading. Go on get cooking!

Easiest Way to Make Perfect Chilli Cheese Fried Potatoes

Easiest Way to Make Perfect Chilli Cheese Fried Potatoes

Chilli Cheese Fried Potatoes.

Chilli Cheese Fried Potatoes

Hey everyone, it's Louise, welcome to my recipe site. Today, we're going to make a special dish, chilli cheese fried potatoes. It is one of my favorites. This time, I will make it a little bit unique. This will be really delicious.

Chilli Cheese Fried Potatoes is one of the most well liked of current trending meals in the world. It's simple, it's fast, it tastes yummy. It is enjoyed by millions every day. Chilli Cheese Fried Potatoes is something which I have loved my whole life. They're fine and they look wonderful.

To begin with this particular recipe, we have to prepare a few components. You can have chilli cheese fried potatoes using 8 ingredients and 4 steps. Here is how you can achieve that.

The ingredients needed to make Chilli Cheese Fried Potatoes:

  1. {Make ready of large russet potatoes, cubed.
  2. {Get of Hamburger.
  3. {Take of large can chilli with beans.
  4. {Prepare of shredded cheese (I use Colby Jack).
  5. {Make ready of yellow onion, diced.
  6. {Prepare of small can tomato sauce.
  7. {Take of Onion and Garlic power (I add a tablespoon of each).
  8. {Prepare of Salt and Pepper,.

Steps to make Chilli Cheese Fried Potatoes:

  1. In a large skillet fry the hamburger and onion til hamburger is no longer pink and onion is soft. Drain the grease and set hamburger mixture aside..
  2. In a large saucepan add the can of chilli, hamburger mixture, tomato sauce, onion and garlic powders. Cook til heated through..
  3. In the same skillet u fried the hamburger mixture in add a little more oil and add your cubed potatoes. Salt and Pepper the potatoes. Fry til soft and golden brown. To assemble...put some potatoes on a plate or in a bowl. Add some chilli over the top of the potatoes and cover with shredded cheese..
  4. I serve this with homemade bread and butter. Enjoy ☺️.

So that's going to wrap it up for this exceptional food chilli cheese fried potatoes recipe. Thanks so much for your time. I'm confident you can make this at home. There's gonna be interesting food in home recipes coming up. Remember to save this page on your browser, and share it to your family, friends and colleague. Thanks again for reading. Go on get cooking!

Step-by-Step Guide to Make Super Quick Homemade Chicken Fried Rice

Step-by-Step Guide to Make Super Quick Homemade Chicken Fried Rice

Chicken Fried Rice.

Chicken Fried Rice

Hello everybody, I hope you are having an amazing day today. Today, I will show you a way to prepare a special dish, chicken fried rice. It is one of my favorites food recipes. For mine, I will make it a bit unique. This will be really delicious.

Chicken Fried Rice is one of the most favored of recent trending foods in the world. It's simple, it's fast, it tastes yummy. It's appreciated by millions every day. Chicken Fried Rice is something that I've loved my entire life. They are nice and they look wonderful.

To begin with this particular recipe, we must first prepare a few components. You can cook chicken fried rice using 18 ingredients and 7 steps. Here is how you cook it.

The ingredients needed to make Chicken Fried Rice:

  1. {Take 2 cups of cooked but cold rice.
  2. {Get 2 pieces of chicken breast strip cut.
  3. {Make ready 1 tbsp of oyster sauce.
  4. {Prepare 2 tbsp of soy sauce.
  5. {Take 1 tsp of garlic.
  6. {Make ready 1 tsp of ginger.
  7. {Prepare 1/2 of onion chopped.
  8. {Prepare 1/4 cup of spring onion chopped.
  9. {Prepare 2 of baby carrot chopped.
  10. {Prepare 1/4 cup of green peas.
  11. {Prepare 3 tbsp of peanut oil.
  12. {Get 1 tbsp of sesame oil.
  13. {Get 2 of eggs beaten.
  14. {Take 1 tbsp of butter.
  15. {Make ready 5 of green chillies (optional).
  16. {Make ready 1 tbsp of chicken stock powder.
  17. {Get 1 tbsp of salt.
  18. {Take 1 tsp of pepper.

Instructions to make Chicken Fried Rice:

  1. Heat up wok on medium to high heat.
  2. Add a little peanut oil and fry eggs to soft omlette and set aside.
  3. Add some more peanut oil, onion, garlic & ginger. Stir fry until brown.
  4. Add chicken, salt & pepper. Stir fry for 3-4 minutes.
  5. Add carrot. Cook for a minute.
  6. Add rice, oyster & soy sauce. Stir fry for 5 minutes.
  7. Add cooked egg, green peas, spring onion, sesame oil, butter & chicken stock powder. Stir fry for 2 minutes.

So that's going to wrap it up with this exceptional food chicken fried rice recipe. Thanks so much for your time. I am confident you will make this at home. There's gonna be interesting food at home recipes coming up. Don't forget to save this page on your browser, and share it to your loved ones, friends and colleague. Thanks again for reading. Go on get cooking!